FAQs

Click on an item or question to see the explanation or answer.

1. Website/Club Features

A place to ask questions, share projects, discuss tools and methods, review or post follow along projects. Discuss about anything you want.
A place to share photos of your work, get critique and comment on others work. A great place to get inspiration for your next project.
A place to easily find members and links to their work. Start a private or shared conversation with a member, find the board members.
You can buy items with the Segmented Woodturners logo. Go to the home page and select the option “SWT Apparel” located on the top of the page. This will take you to our clubs Lands End page where you can select the items you want to purchase.
Weekly photo selected by the board for extra praise and bragging rights.
Get to know your fellow segmenters, their creations and bio. We welcome your submissions for this monthly feature - send bio and photos to admin@segmentedwoodturners.org.
Each year members can join in a holiday exchange of their work with other members. Always fun to take part in, build a collection of others work and share your own.
Usually every 2 years we have a 3 day face to face meeting with workshops, demos, banquet and lots of fun.
 Periodically, the chapter sponsors a chapter meeting that includes shop tours, discussion topics, show and tell, and just friendly chatter.
Get a grant for approved projects - Grant Program
Buy or sell tools, wood etc. - Found in the Forum under the Classified topic.
A place to find links to useful info, relevant Youtube videos, vendors sites, members websites, “how to” project pages. We actually have two resource sections.  One called Segmenter's Resources is accessed from Home page with content to attract non members and the other called Member Resources has its link on the top menu of the Forum and Gallery. 
From time to time, the Segmented Woodturners board posts a challenge to members to create a piece that meets a simple challenge and is posted in the Gallery by by a given date.  They are announced in the Forum.

2. Website membership including login and club contacts

From the home page, select “Contact” on the main menu
From the home page, select "Forum", Login, click on your name or avatar at top right of screen, select “Password and Security”
Contact the webmaster - from the home page, select “Contact” on the main menu. In your message indicate your current user name and your desired name.
From the home page click on “Join Segmented Woodturners or Renew Membership” button on the yellow banner just above the pictures.

3. How to use the Forum/Gallery

Instead of clicking on the photo itself, click on the title or the text and it will open the comments. Scroll to the bottom and add your comment in the dialogue box. Type something constructive! Click on the “Post comment” button.
From the home page, select “Forum”. Click on the orange “Post Thread” button. Select a suitable category. If in doubt “General Segmented Woodturning” is a good place to go. Add a descriptive title in the title box indicating your topic. Then ask your question or add your information in the box below the title. Click on the “Post” button. You can add additional info at any time.
You can copy/paste images directly into the text box. Alternatively, under the text box, click on the “Attach files” button and navigate to your file and open it. You will see the file load in a separate small box. With images, there is an extra step, click on the “insert” button and choose “thumbnail” or “full image”. You can attach about any type of file.
Any post you make in the Gallery or Forum can be edited or deleted. Look for the small blue text options at the bottom of the text box. Click on “Edit”, make your changes and click on “Save”. To delete the post or image click on Delete
From the home page, select “Forum” and login. Click on your name or Avatar at the top right of the page. Select “Preferences” from the drop down menu. Make sure all the boxes have check marks to allow notifications. Select a Forum category e.g. “General Segmented Woodturning”. On the top right, look for a button Watch”. Click on this and check the relevant boxes to get notifications emailed. The same can be done in the gallery. Select a gallery category e.g. “Bowls”. Click on the “Watch” button and check the relevant boxes again.
From the home page, select “Gallery” on the main menu. Click on the orange “Add Media” button and select a suitable category – e.g. “Bowls”. Click on the “Upload File” button and navigate to and open your photo. Note that your photo should be 1200x1200 max pixel size – you may have to resize it before loading it. You should now change the title to what you want your project to be called – it will default to the photo file name, but you can change it. Add a description – include the size of the project and woods used. Click on “Save” and it will post in the gallery.

4. How to find information on the website

From the home page, select “Forum” from the main menu, select “Members” from the new main menu. You can search for the person here using their user name – typically start typing their first name in the search box. Alternatively, anywhere you see their name in the forum or gallery, just click on their name or avatar photo and select “start conversation” from the dialogue box. This will be a private conversation, you can add multiple members if you want to.
From the home page, select “SWT Apparel” from the main menu. This will send you to a Lands End store where you can buy apparel and merchandise with the SWT logo.
Check out the gallery, thousands of projects going back to 2009. From the home page, select “Gallery”. You can select a category e.g. “Bowls” or for a great short list, select “Photo of the Week” category for a number of projects selected by the board. You can find this from the home page too. Just click on the current “Photo of the Week” picture.
 This is part of the forum. From the home page select “forums” from the main menu. Select the “Classifieds” category and post a new thread with your items for sale.

5. How to get started in segmenting

From the home page, select “Forum” from the main menu. From the new main menu, select “Member Resources”, select “Projects”. You will find a large collection of project pages. Also check out the follow along projects in the forum. Here are a couple of beginners follow along projects: Tumbling Block Platter, Salt Pig - a fun project for anyone to try
From the home page, select “Forum” from the main menu. From the new main menu, select “Member Resources”, select “Projects”. You will find a large collection of project pages including BFB.
From the home page, select “Forum” from the main menu. From the new main menu, select “Member Resources”, select “Projects”. You will find a large collection of project pages including open segmented projects.
From the home page, select “Forum” from the main menu. From the new main menu, select “Member Resources”, select “Segmented Techniques”. You will find several methods for making floating bases as well as domed bases. Here is an alternate commonly used method for floating bases, included in a follow along project: box-turtle-follow-along-project-floating base
No, whatever lathe tools you use for woodturning will serve you well for segmented work.  There are various methods of cutting the segments.  No one way works for everyone.  There are ways to do it with cut off saws as well as methods using table saws.  Special safety considerations are needed using each specific cutting technique.  If you join the Segmented Woodturners group you will have access to the forum which contains discussions of these varied techniques.  Meanwhile, you can check with your local woodturning group to identify members who do segmented work.  These people are normally an excellent source of information and can help you perfect your technique.  Retailers such as Woodcraft and Rocker normally carry a number of books you can reference.

6. Other Segmenting Questions

The short answer is that you can’t unless you keep the piece in a dark closet or a shoe box.  The fact is that there is no finish that will eliminate the effects of UV light which affects all woods.  You can use a marine varnish with UV inhibitors.  That will delay the color change slightly, but it can’t be eliminated. The best approach is to accept that the wood color will change and create a design that will look good today and in 10 years.  For example, don’t put similar color woods together because they will likely look the same sometime down the road.
There are a few things that can cause gaps in your rings.
  1. The angle is not correct on your saw. Make a sample ring from scrap wood and clamp, if you see gaps when you put the ring up to the light, make a minor adjustment to the angle and make another test ring until the gaps are gone.
  2. Make sure that your saw blade is perpendicular to your cutting surface. If your saw is not finely tuned, inaccuracies can occur.
  3. When gluing segments make sure that the tips of all segments are touching each other. If just one segment is not positioned accurately in the ring it will change its angle and a gap forms.
  4. If you do a dry fit of the ring and see a gap, use the half ring approach.
  5. If you have a hard time gluing all the segments at one time. Use a rub joint to glue segments in pairs.  You then have less glue joints to deal with when you put it in the clamps.
It depends.  You must do whatever is necessary to avoid gaps or thick glue lines in your turning.  Even if you get the angle correct off the saw but have imperfections on the surface of the segment edge, you will see a gap.  If you have a saw with no blade wobble and have a sharp blade, sanding may not be needed.  Look at each surface before gluing and check for kerf marks or other imperfections.  Sand if you need too.
Without sounding like a wise-guy.  The most important answer is a SHARP one.  Dull blades cause imperfections in the cut surface.  Look for is a crosscut blade as opposed to a rip blade which does not give as clean of a cut.  As far as manufacturers, it you ask 5 turners, you will get 5 answers for different brands.
The two most common approaches are rubber bands or Metal Band clamps.  Apply multiple rubber bands to add more pressure.   Metal band clamps are the most popular.  They can be purchased in multiple sizes in the plumbing department of most home centers. Another popular method is the rub joint method where pairs are glued then 4's, etc. Glue is applied to a joint, the pair of segments are then rubbed together until the joint tacks up holding the pieces together. 
Miter saws, table saws, and band saws have all been effectively used to cut segments.  Use what you have in your shop.  Any tool will need a fixture for accurately and safely cutting the segment angles.  Bandsaws have the disadvantage that the segment edges will have to be cleaned up on a disk sander before gluing.   If you have a table saw, consider making a wedgie sled.  In recent years, it has become a very popular jig.  Search the internet for the keyword “Segmentology”.  It will take you to some good videos on the topic.
What you are looking for is a glue that secures the pieces quickly, has longevity and durability, is easy to work with, and hides the glue joints well.  I would start with Titebond Original.  If you progress to more complicated glue ups where you need more time to position the pieces, you may consider using Titebond extend.  Talk to fellow segmented woodturners or consider joining the Segmented Woodturners group so that you have access to our forum where many discussion threads on glues exist.
That is a tough one.  Woods that have high oil content like teak, ebony, and bloodwood are notorious for causing this problem when sanding.  A few approached that might help.
  1. Apply a spray sealer before sanding. Shellac is good because it does not react with the oil in the wood.  Don’t use a brush since it will spread the oil.  The sealer will block the pores of the wood and help keep the unwanted dust out.  Lightly sand and if needed apply more sealer. 
  2. Use compressed air. While sanding on the lathe, use compressed air to blow the dust away quickly before it embeds in the wood.
  3. Keep your sandpaper clean
  4. Try shear scraping to get a good enough finish of the tool so sanding is not needed
MM = inches * 25.4
INCHES = mm * .0393
Convert from inches to millimeters:  Example of 10" board: 10" * 25.4 = 254mm
Convert from millimeters to inches:  Example of 254mm board: 254mm * .0393 = ~10"
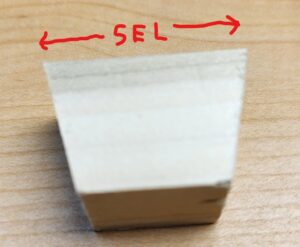
SEL = Circumference divided by number of segments = (Pi * Diameter) ÷ number of segments. Example SEL of 8" diameter 12-segment ring: SEL = (3.1416 * 8) ÷ 12 = 25.1328 ÷ 12 = 2.09". Cutting Angle = (360 ÷ 12) ÷ 2) = 15° 
The length of the edge of the segment which is the longer of the 2 parallel edges of the trapezoid shape (it will be on the outside edge of the ring). The Segment Edge Length determines the outside diameter of a ring. 
(360° - (segments * gap)) ÷ segments ÷ 2. 
Example: 24 open segment ring with 4 degree gap = (360 - (24 * 4) ÷ 24 ÷ 2 = (360 - 96) ÷ 24 ÷ 2 = (264 ÷ 24) ÷ 2 = 11 ÷ 2 = 5.5°
360 divided by the number of segments divided by 2. Example: 24-segment ring = (360° ÷ 24) ÷ 2 = 15 ÷ 2 = 7.5 degrees
Yes.  Some of the most popular being Segmented Woodturning Design (http://www.segmentedturning.com/, Turned Wood (www.turnedwood.com), Woodturner PRO (www.woodturnerpro.com) SegTurn (http://www.segturn.com/index.html).  As with most programs, they all operate a bit differently in their ease of use and ability to design what you want.  Like most things, do your homework before you buy and determine which software is right for you and fits your budget.  If you ask various people you will get varied answers, but I personally prefer the ease of use, high level of customer support and a wide range of design that Woodturner Pro affords.  I am but one person with one opinion.  Ask around and check out the web pages.  And no, I have no financial ties to any of these software packages.  Lastly, do a web search on segmented woodturning software as new products may have come on the market since this answer was written.